Tutorial: How to make your own InboxSpecialist skins
This short tutorial will show you how you can design your own skins
for Inbox Notifier. Although designing skins is technically not complicated I recommend it
only to people who know at least how to use a draw program like MS Paint. I will show you
everything with the default skin as example.
Step One:
Make a copy of the folder InboxSpecialist\Skins\default and name it after the
name of your skin.
Step Two:
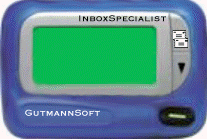
Draw a picture of the skin without any buttons pressed. Name that
picture main.bmp and put it into that folder.

Make a new bitmap with exactly the same height and width as main.bmp. Draw the limits of
the window with black color as shown below. Save that file as mainmask.bmp

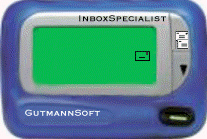
Take again main.bmp and modify it so that all buttons look like they were pressed and save
that picture as selected.bmp

Take a picture of yourself and save it as author.bmp. The ideal size for such a picture is
64x64 pixel.
Step Three:
Now you have done all the drawing and you need to tell
InboxSpecialist where the buttons on these drawings are. Open the file skin.ini with a
text editor like Notepad. For the default skin the values look like this.
[HOTAREAINFO]
Count=4
1=BUTTON_CHECK, 169, 11, 23, 41, Check for new mail
2=BUTTON_INBOXPREVIEW, 172, 53, 21, 40, Show Inbox Preview
3=BUTTON_CLOSE, 156, 102, 42, 27, Close Inbox Notifier
4=BUTTON_NOTIFY, 130, 51, 25, 25, Blinks when new mail arrives, FALSE
The format means:
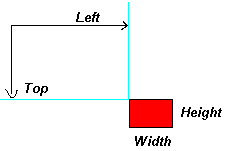
Function=Button Name, Left, Top, Width, Height, Description
Do not change the numbers before the "=" and the button
name. The button name has to be written in capital letters. Left, Top, Width and Height
are to be calculated like this:

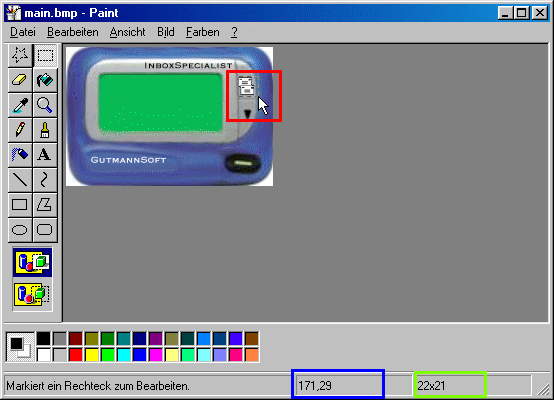
Finding this values is very easy when you use MS Paint which comes with Windows. When you
use that tool on the picture below then you can select the button's area (see read border)
and MS Paint will display the left, top values (blue border) and width, height (green)

Step Four
After you have told InboxSpecialist where all buttons are you may
want to tell it where to display the labels for the date, time and the status and also how
these labels have to look like. Here's an example.
[DISPLAYINFO]
Charset=1
Count=3
1=DISPLAY, MS Sans Serif, FALSE, FALSE, 8, $00000008, 35, 70, Normal, Ready
2=DATE, MS Sans Serif, FALSE, FALSE, 8, $00000008, 35, 30, Normal, ...
3=TIME, MS Sans Serif, FALSE, FALSE, 8, $00000008, 35, 46, Normal, --:--:--
The values mean: Label name, Font name, Bold, Italic, Font size, Font color,
Left-coordinate, Top-coordinate, Style, Default Text
Label name: Identifies the label. Must be one of the values in the example above.
Font name: The name of the font. Note that a potential user of you skin must also have
this font installed on his system.
Bold: Definies if the text is displayed bold or not. Possible values are:
TRUE or FALSE.
Italic: Definies if the text is displayed italic or not. Possible values are: TRUE
or FALSE.
Font Size: The size of the font. Please note that some fonts may not display smaller as a
certain number. MS Sans Serif for example will display a font size of 8 even if you
specify a size of 4.
Left-coordinate: See the description of step 4 to find out how to get that value.
Top-coordinate: See the description of step 4 to find out how to get that value.
Font Color: The color of the text. To get that value you will need the Skin Color Picker
program, which you can download freely here: https://www.gutmannsoft.com/inboxspecialist/colorpicker.zip
Alternatively you may also just pick one of the values from the table below.
| Color Name |
Font Color value |
| light-grey |
$00C0C0C0 |
| grey |
$00808080 |
| dark-grey |
$00414141 |
| black |
$00000000 |
| white |
$00FFFFFF |
| light-blue |
$00FFFF80 |
| blue |
$00FF0000 |
| dark-blue |
$00800000 |
| light-green |
$0000FF80 |
| green |
$00008000 |
| dark-green |
$00004000 |
| orange |
$000080FF |
| red |
$000000FF |
| dark-red |
$00000080 |
| brown |
$00004080 |
Style: A feature resereved for the future. The only valid value is
currently NORMAL
Default Text: The text that is displayed in the skin before InboxSpecialist begins to fill
in its own text. Changing this text rarely makes sense.
Step Five:
Enter all information in the section [AUTHOR] in the file skin.ini This information will
be later displayed in the window "about the current skin"
[AUTHOR]
Skinname=Default Pager
Picture=author.bmp
Name=Martin Gutmann
Homepage=www.gutmannsoft.com/inboxspeskins.htm
Email=skin_at_gutmannsoft.com
Comments=This is the first skin for InboxSpecialist. Not a very good one. Make one
yourself and post it to the Inboxspecialist homepage.
Step Six:
Record a short little wav file and name it alarm.wav. This file will
be played when new mail arrives. You can define how many times it should be played per
alarm by editing the following section in skin.ini.
[Sound]
Repeat=3
Step Seven:
Test the skin. Right click on the current Inbox Notifier skin and
choose "load skin/other" now select the skin.ini of your own skin. Your skin
will be listed in the menu "load skin ->" when you copy the whole folder into
the folder InboxSpecialist\Skins\
Step Eight:
Please email the skin
so we can publish your skin and other people can have fun with it. To email the skin you
have to put the whole folder of your skin in a zip-file. Drop us a line on the
contact page to get the email
address.
|